Expansive market reach and high revenue potential are two advantages of iPhone application development.
Therefore, releasing your company’s app on the App Store can be more beneficial than doing it on Google Play.
But, how do you ensure a successful iOS application development?
Whether you decide to develop your iOS app in-house or with the help of a professional app development agency, read on to learn the important stages!
7 Essential Steps in iOS Application Development
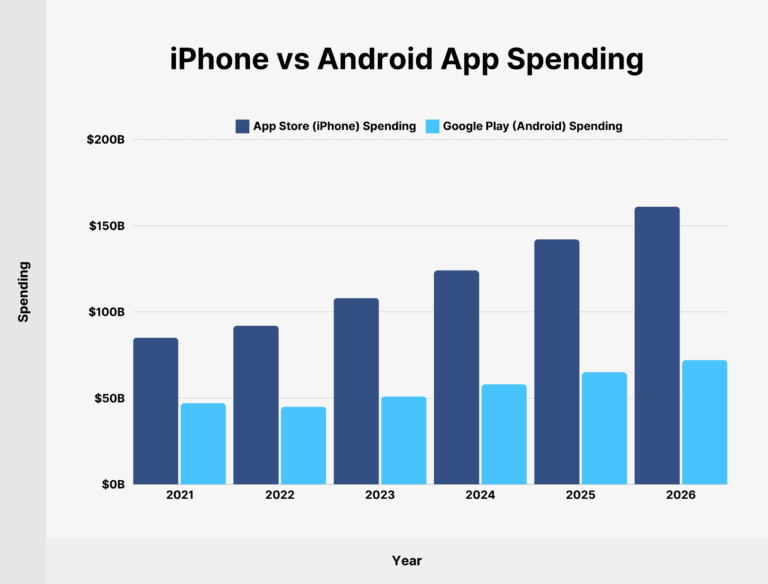
Although Android has a large market share, the revenue you can gain from iOS applications is much more promising. Take a look at the statistics below.

Source: Backlinko
Why so? From these insights, you can also assume that iOS users are “premium” customers. They’re more affluent than most Android users.
As a result, Apple users are willing to pay more – be it for paid apps, in-app purchases, or subscriptions).
But, selling your iOS apps to the consumers might not happen overnight. In any case, here are the step-by-step of iOS application development to follow:
1. Find An Idea Through Market Research
How can you make a well-received app that can retain users? For that to happen, the app has to solve your target users’ problem.
To know what users need, do some market research. This can be as simple as surveying individuals who belong to your intended market.
Once you understand their pain points, proceed with analysing potential competitors. Doing so helps you offer a better solution for target users.
Also, check out the newest iOS development trends to give you ideas that can be used to solve user problems.
2. Create A Software Requirements Specifications
Now that you already have an idea of what to build, you need to create a software requirements specifications (SRS) document.
This document should explain the app’s requirements, specifications, and constraints. Its goal is to keep developers and clients on the same page.
An SRS document usually consists of:
- App purpose – what the app does and who it is made for
- Functional requirements – the list of features intended to solve users’ problems and how they work
- Non-functional requirements – the description of the app’s performance, including its security, scalability, and maintainability
- Constraints – limitations to keep the development within its scope
3. Choose The Right Development Tools
Each iOS app development requires a specific technology stack. Without the appropriate tools, the creation process may get prolonged.
However, you can keep things simple by opting for an all-rounder solution like Apple’s native technology stack. It comprises of the following:
- XCode – Apple’s integrated development environment that offers a code editor and testing tools
- Swift – one of the best iOS programming languages for its ease of use
- Objective-C – a programming language used to develop legacy apps
- C++ – a programming language for creating resource-heavy apps and games
4. Design The User Interface
Apart from usability, what draws users into apps is an appealing yet easy-to-understand user interface. That is why you need to plan your app’s visuals thoroughly.
Begin by drawing wireframes, the sketches of your app’s UI. They should include not only each page of the app but also the navigation flow.
Ask for clients’ feedback on your sketch. Once they are happy with the wireframes, it is time to create a mockup of the interfaces.
You can refer to Apple’s Human Interface Guidelines for ideas. Following this set of best practices will help your app to be accepted by users and pass the App Store’s requirements.
5. Build The App
This is where the biggest part of development happens. But before you start, it is important to prepare the app’s architecture.
App architecture dictates how different components interact with each other. Therefore, a proper architecture allows for better stability.
If you are looking to develop a simple app, the model-view-controller (MVC) architecture is enough. For complex apps, though, a modular architecture like the view-interactor-present-entity-router (VIPER) is necessary.
Once the architecture is ready, write the code for the app’s front-end and back-end.
The front end refers to your app’s user interface and navigation system, while the back end consists of the code for processing and serving users’ requests.
The front end and the back end are connected with an Application Programming Interface (API). You must ensure that the API works well so that requests are handled without issues.
6. Perform Tests
A fully functional app must pass various types of tests. Some of the common ones are:
- Smoke testing – an evaluation of the app’s features
- Performance testing – a test on the app’s performance
- Usability testing – a check on the app’s user experience
You can perform all these tests manually, but they will take a long time. Using automated testing tools like Appium and XCtest is recommended as they can save time.
7. Submit Your Work to The App Store
Now you are ready to launch your app on the App Store. However, Apple will review your app to decide whether it should be listed on the App Store.
Therefore, following the App Store’s Guidelines is imperative. The Guidelines cover some aspects, including your app’s performance, security, design, and legality.
According to a thread in Apple’s developer forums, App Store’s review takes up to 48 hours.
Conclusion
Now you know all of the essential steps in iOS application development.
From researching the market to submitting your app for review, everything has to be done thoroughly to ensure success.
However, obstacles can come up during any development stage.
Due to that, it is important to partner with an iOS app development agency you can trust.
Contact us today and consult with our team!


